Do you manage documents such as insurance letters, tax records, medical bills, and contracts across email, scanned files, PDFs, and paper records? As documents accumulate in different formats and locations, staying organized becomes increasingly difficult.
To solve this problem, many users are adopting paperless workflows that make documents easier to search, organize, back up, and share.
Fortunately, Linux offers a mature open-source ecosystem for scanning and document management. When combined with a reliable document scanner, you can build an efficient paperless workflow without relying on proprietary software or cloud-only services.
In this article, we’ll explore how to set up a Linux document scanning and management workflow, along with the tools commonly used to support it.
Why More Linux Users Are Embracing a Paperless Workflow
A paperless workflow is about more than simply scanning documents into PDF files. The real goal is to create a digital archive that is searchable, well-organized, and easily accessible.
For Linux users, this approach offers several key advantages:
- Easier document organization
- Full-text search through OCR technology
- Reduced paper clutter
- More convenient backup and long-term storage
- Seamless integration with self-hosted tools
- Greater privacy and control over personal data
Many Linux users also prefer open-source software over relying entirely on commercial ecosystems. This preference for transparency, flexibility, and data ownership is one of the main reasons why paperless workflows have become increasingly popular within the Linux community.

Popular Scanning Tools for Linux
Linux offers a mature and flexible scanning ecosystem built on a layered architecture. At the foundation is a unified hardware interface, while the applications on top range from simple, beginner-friendly tools to advanced software designed for professional workflows.
Rather than competing with one another, these tools serve different purposes and are often used together as part of a complete scanning setup.
SANE: The Foundation of Linux Scanning
SANE (Scanner Access Now Easy) is the backbone of the Linux scanning ecosystem. While it is not a graphical scanning application itself, it provides the backend drivers and interfaces that allow scanning software to communicate with scanner hardware.
Most Linux scanning applications—including Simple Scan, XSane, and many others—rely on SANE to detect and operate scanners. In essence, SANE acts as the underlying engine that powers scanning functionality across Linux systems.
Some of SANE’s key advantages include:
- Support for a wide range of scanner models and manufacturers
- A standardized interface for accessing scanner hardware
- Command-line tools for automation and advanced workflows
- Excellent compatibility across different Linux distributions and desktop environments
To verify that your scanner has been detected correctly, you can run the following command:
scanimage -L
If your scanner appears in the output, it indicates that the SANE backend is installed correctly and that the system can communicate with the device successfully.
For many Linux users, setting up SANE is the first step toward building an efficient and reliable document scanning workflow.
Limitations
SANE is a backend framework only. It does not include a user interface, OCR engine, or document management tools, so it must be used alongside other applications to create a complete scanning workflow.
Ideal Users
Developers, system administrators, and power users who want greater control over scanner configuration, troubleshooting, and automation.
Simple Scan (A Lightweight, Beginner-Friendly Scanning Tool)
Simple Scan is one of the most widely used scanning applications on Linux desktop environments. Designed with simplicity in mind, it offers an out-of-the-box scanning experience. While it relies on SANE as its backend, it provides a clean and intuitive graphical interface that makes scanning easy for everyday users.
Its key advantages include:
- One-click scanning and preview
- PDF export support
- Multi-page document merging
- Automatic rotation and basic image enhancement
- Ability to save scans in common file formats
For everyday office work and home document digitization, Simple Scan is more than capable of handling most scanning tasks.
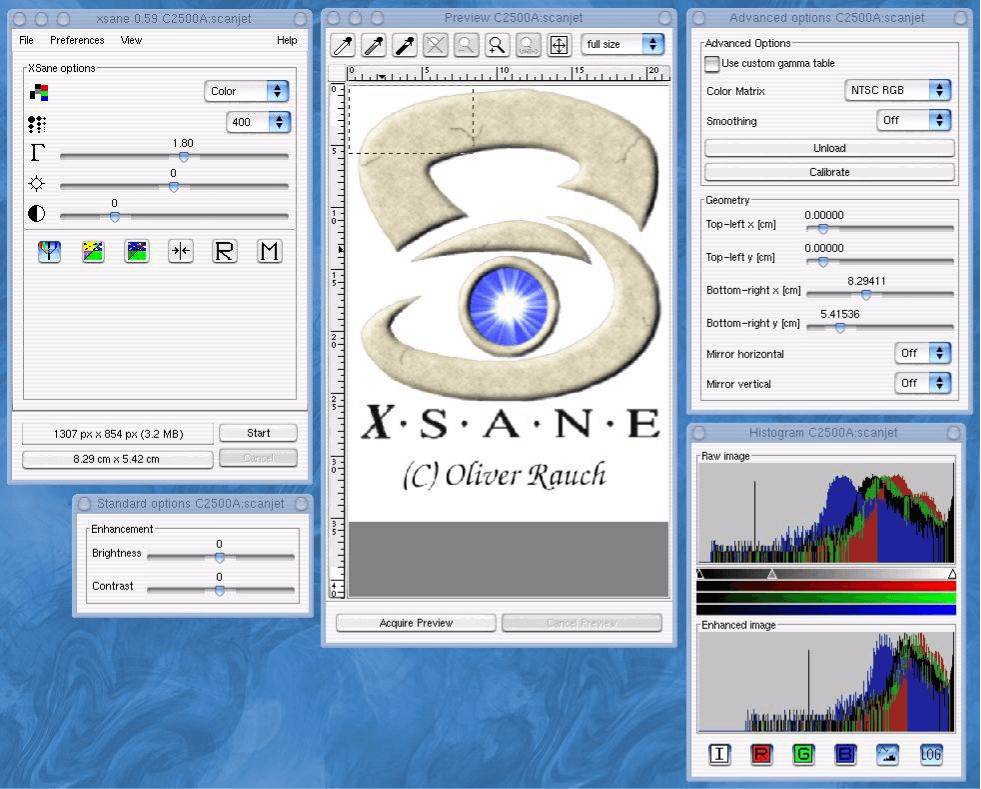
XSane (A Professional-Grade Scanning Control Tool)
XSane is one of the most feature-rich scanning applications available on Linux, offering an exceptional level of control over the scanning process. Rather than functioning as a simple scanning utility, it serves as a comprehensive scanning control center designed for users who require advanced customization and precision.
Its key capabilities include:
- Fine-grained DPI adjustment for high-resolution scanning and archival purposes
- Advanced color correction, gamma, and exposure controls
- Batch scanning and automatic page-processing workflows
- Support for multiple output formats, including images and PDF files
- Built-in image enhancement and scan pre-processing tools
Thanks to its extensive range of controls and professional features, XSane remains a popular choice for users who need precise scanning settings and high-quality document or image digitization.
Skanlite (A User-Friendly Scanning Tool for KDE Users)
Skanlite is a lightweight scanning application designed for the KDE Plasma desktop environment. It focuses on providing a simple, native scanning experience while offering more control than Simple Scan.
Its key features include:
- Seamless integration with KDE Plasma
- Fast startup and a clean interface
- Basic scanning parameter adjustments
- Ideal for scanning single pages or small document batches
Limitations
It offers fewer advanced features than XSane and is less widely used outside the KDE ecosystem.
Best Suited For
KDE Plasma users who want a lightweight, easy-to-use scanning tool with basic control options.
Why Linux Paperless Workflows Depend on OCR and Automation

After scanning a document, many users quickly realize that scanning alone does not create a truly digital workflow. It simply converts paper into PDF or image files.
On Linux, this challenge is even more apparent. While the platform provides reliable scanning tools, features such as text recognition, document indexing, and workflow automation often rely on additional software. As a result, OCR, or Optical Character Recognition, and automation tools are essential to making a paperless system truly effective.
Scanning Does Not Equal Usable Data
Whether you use Simple Scan, XSane, or another scanning application, the output is usually a PDF or image file. These files have several limitations:
- Text cannot be searched directly
- Content cannot be easily copied or edited
- Documents are difficult to organize systematically
- Search and indexing capabilities are limited
In other words, a scanned document is often just a digital image rather than a searchable, usable document.
While Windows and macOS often handle this through built-in OCR or commercial software, Linux users typically need to add OCR and automation tools to complete the workflow.
The Importance of OCR in Linux: Turning Images into Searchable Documents
OCR (Optical Character Recognition) is a key part of any Linux paperless workflow. It converts text within scanned images into searchable and editable content.
With OCR, scanned documents become much more useful:
- Full-text search becomes possible
- PDFs become searchable instead of static images
- Content can be copied and edited
- Documents can be integrated into knowledge management systems and digital archives
Popular Linux OCR tools, such as Tesseract, are typically integrated into the workflow manually rather than provided as built-in features.
A common Linux paperless workflow looks like this:
Scan → OCR Processing → Searchable PDF → Automatic Archiving
Automation Tools: The Efficiency Multiplier of Linux Paperless Workflows
Beyond OCR, automation is what makes a Linux paperless workflow truly efficient.
Linux’s scripting-friendly nature allows users to build custom workflows for tasks such as:
- Batch processing scanned files
- Automatically running OCR
- Renaming and organizing documents
- Syncing files to cloud storage or a NAS
- Scheduling tasks with cron
The advantage is flexibility—users can tailor the workflow to their needs rather than relying on a fixed software ecosystem.
However, this approach also has drawbacks:
- A steeper learning curve
- Some command-line knowledge is required
- Tools often need to be integrated manually
In a Linux paperless workflow, scanning is only the beginning. OCR turns images into searchable documents, while automation makes the process scalable and efficient.
Ultimately, true paperless workflows are not about scanning documents. They are about creating structured, searchable information.
How to Organize Digital Documents
Going paperless is only the first step. Without a clear organization system, digital files can quickly become just as cluttered and difficult to manage as paper documents. An effective paperless workflow depends not only on scanning and OCR, but also on consistent document management practices.
This is especially true on Linux, where users are free to design their own file organization systems rather than follow a predefined structure.
Use a Consistent Folder Structure
A well-organized folder structure serves as the foundation of your digital archive. It helps ensure that documents remain easy to find months or even years later.
A common approach is to organize files by document type:
Documents/

├── Invoices/

├── Receipts/

├── Contracts/

├── Personal/

└── Books/
Use Clear File Naming Conventions
File names are often just as important as folder organization because they directly affect searchability.
Many scanned files use generic names such as:
- scan001.pdf
- IMG_20260101.pdf
While these names may make sense to the scanner, they provide little useful information to the user.
A better approach is to use descriptive, meaningful file names:
- 2026-utility-bill.pdf
- 2026-01-rent-receipt.pdf
- contract-client-acme-2026.pdf
On Linux, clear file names work particularly well with command-line search tools such as find and grep, and can complement OCR-based full-text search systems.
Back Up Your Documents Regularly
The ultimate goal of a paperless workflow is not simply to reduce paper usage, but to ensure that important information remains safe and accessible over time.
Because Linux users often manage their own infrastructure, backups are a critical part of the workflow.
Common backup strategies include:
- Local backups (external drives or SSDs)
- Network storage (NAS)
- Cloud synchronization or self-hosted solutions
Popular tools include:
- rsync
- Syncthing
- Nextcloud
These tools offer a high degree of control and flexibility, which is why many Linux users combine multiple backup methods to create a reliable document management system.
Managing Documents with Paperless-ngx
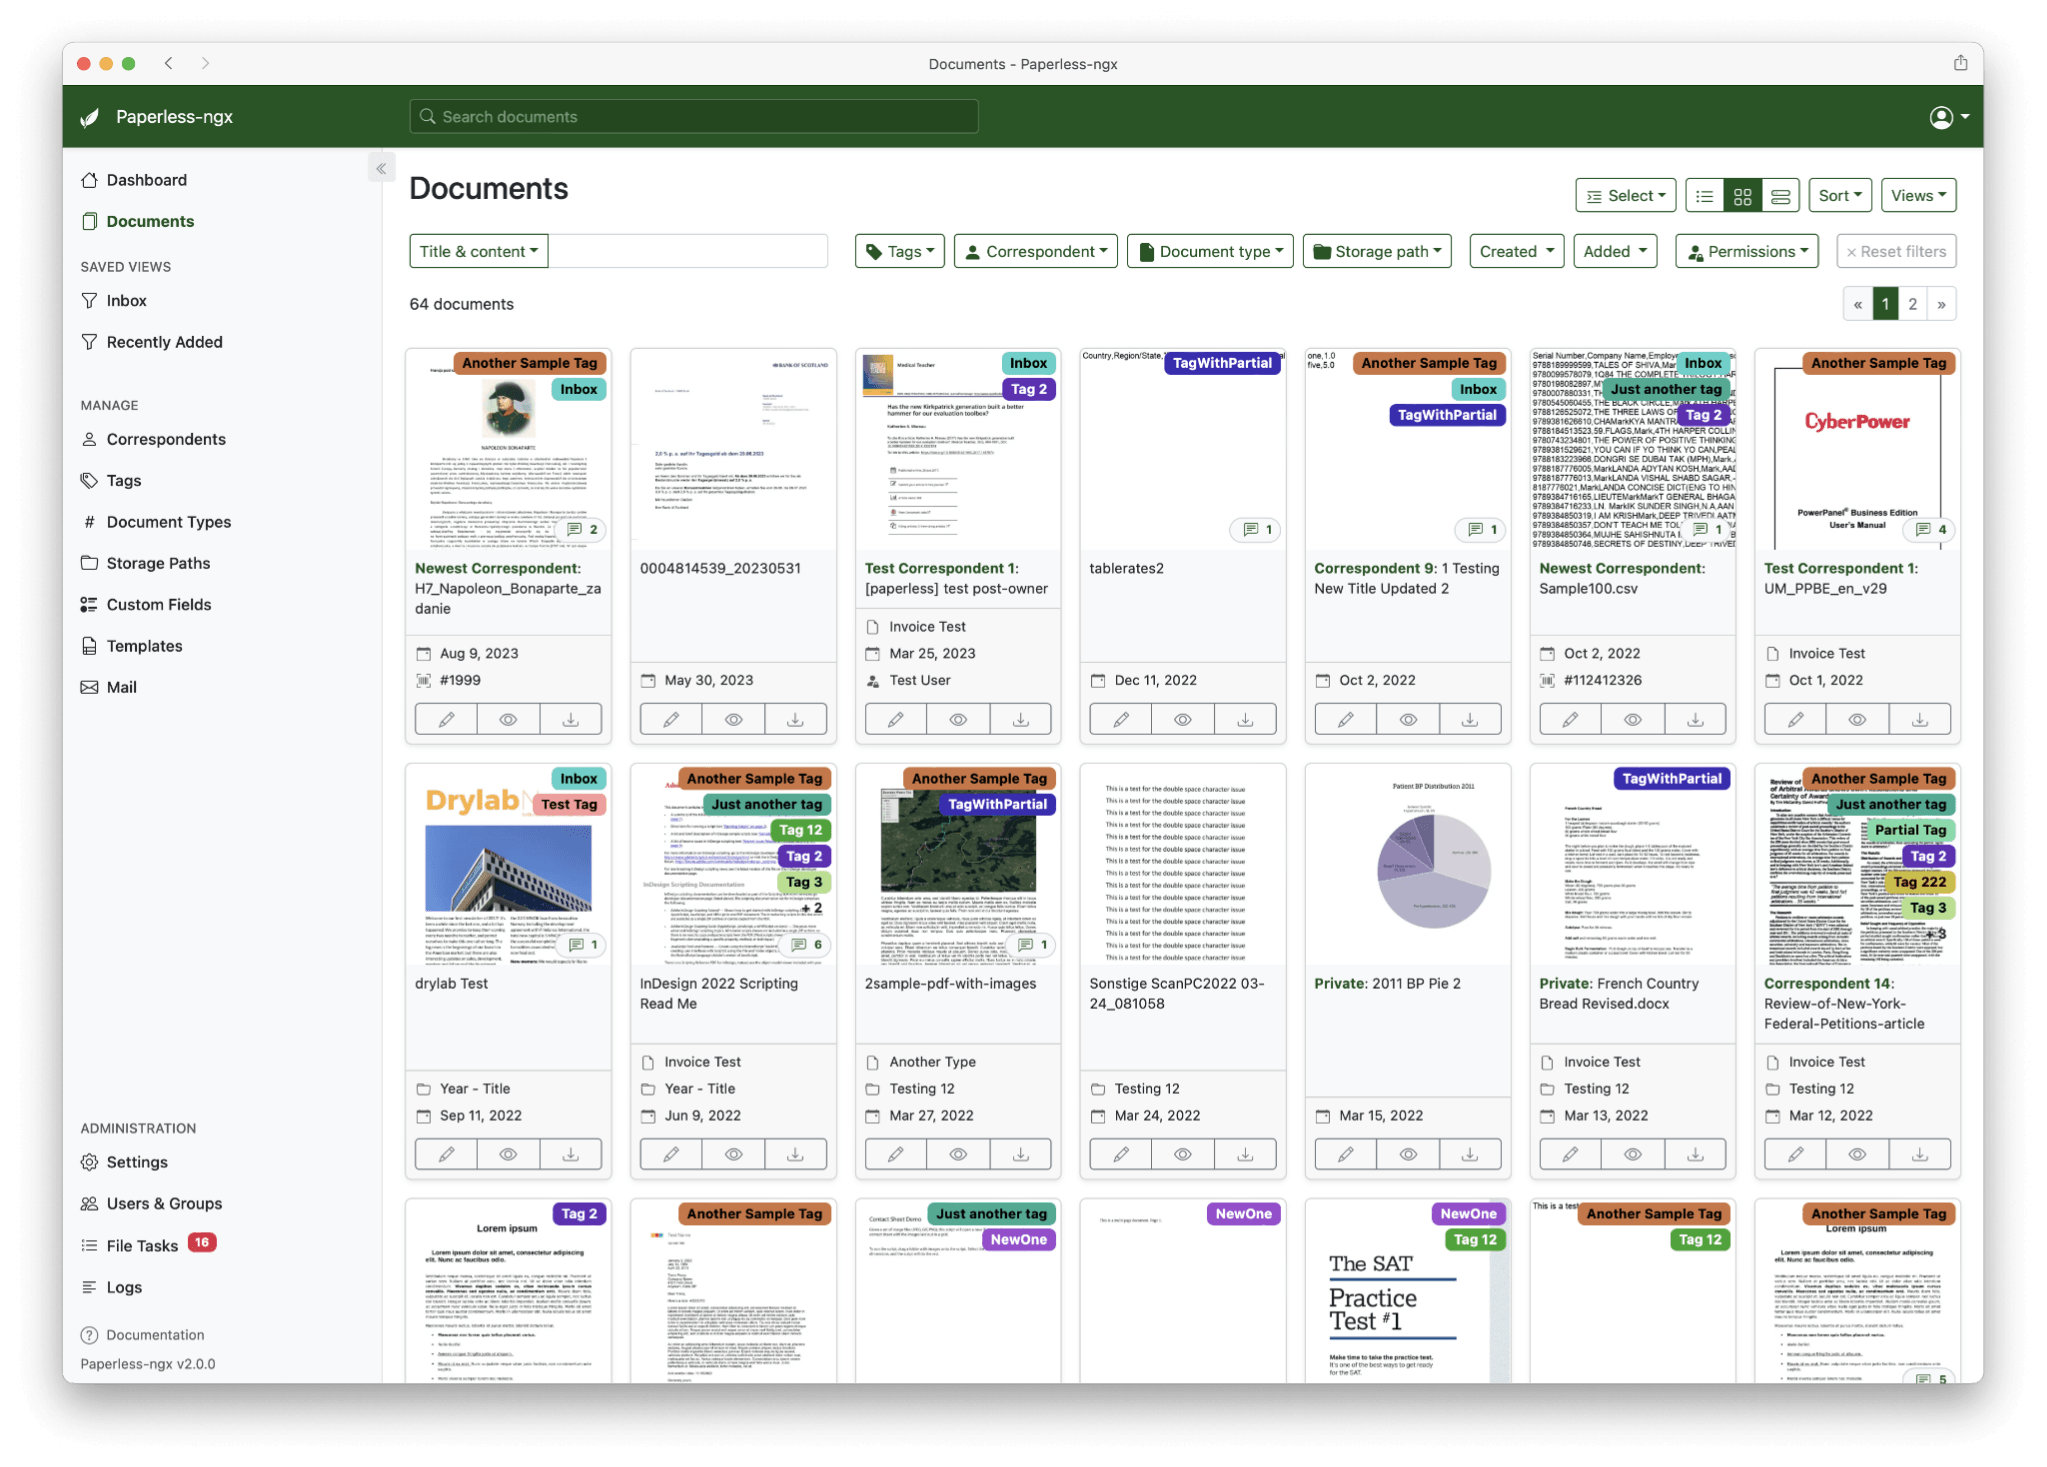
Paperless-ngx has become one of the most popular self-hosted document management solutions for Linux users. More than just a PDF repository, it combines OCR, indexing, classification, and search into a single automated workflow.
Its goal is simple: reduce manual document management. Users place scanned files into a designated import folder, and the system automatically processes them, extracts text, and builds a searchable archive.
A typical workflow looks like this:
Step 1: Import Documents
Scanned files are added to the consume folder through scanner software, NAS synchronization, or manual uploads.
Step 2: Automatic Processing
Paperless-ngx detects new files and automatically adds them to the processing queue.
Step 3: OCR Recognition
The system extracts text from scanned images, making documents searchable.
Step 4: Indexing and Classification
Documents are automatically tagged, indexed, and organized based on their content.
Step 5: Search and Retrieval
Processed files are stored in a central database, allowing users to perform fast full-text searches.
Over time, document management shifts from navigating folders to searching content. Instead of remembering where a file is stored, users simply search for keywords and retrieve documents within seconds.
From a deployment perspective, Paperless-ngx is typically run as a self-hosted application on Linux, with many users choosing Docker for installation and management. Its modular architecture—consisting of web services, databases, OCR processing, and background workers—makes upgrades and backups relatively straightforward. While the initial setup may require some effort, the system can run reliably for years with minimal maintenance.
This makes Paperless-ngx an excellent solution for home offices, remote workers, and small businesses looking to reduce their reliance on paper while maintaining an efficient and automated document management workflow.
Conclusion
Overall, the Linux paperless workflow does not rely on a single tool but instead forms a complete system composed of scanning, OCR, automated processing, and document management. From SANE and scanning tools acting as the “digital entry point,” to OCR converting images into searchable text, and finally Paperless-ngx centralizing archiving and search, each layer helps eliminate the limitations of unstructured paper documents.
Although Linux requires more configuration and integration effort from users in this area, it also offers greater flexibility and control. Once the workflow is properly set up, the entire system can run stably for a long time, gradually evolving from simple file storage into a truly searchable and scalable personal or team knowledge base. This is the core value of Linux-based paperless solutions.
Please read our Comment Policy before commenting.