
Last Updated on June 12, 2023
In Operation
To start Easy Diffusion run $ ./start.sh and point your web browser to http://localhost:9000/
Here’s an image of the web user interface in action. We’ve typed a prompt and clicked the “Make Image” button. The image was created using the Standard Diffusion v1.4 model.

The Image Settings section lets you choose a variety of options such as the model to use, whether to use a custom Variational Auto Encoder to improve the generated image, the sampler, define the image size, and the output format (JPEG, PNG and WEBP are supported).
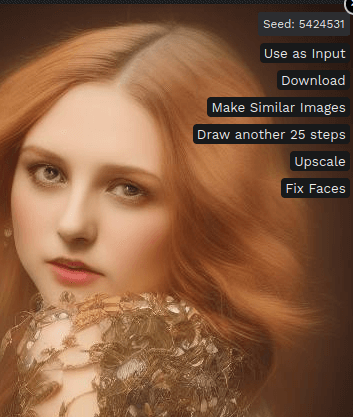 The interface has lots of nice touches. For example, when you hover the mouse over a generated image, you’re presented with a menu with actions:
- Use as Input – this lets you use the generated image as the input image for img2img.
- Download – downloads the generated image.
- Make Similar Images – generates 5 images with img2img.
- Draw another 25 steps – this increase the inference step count by 25.
- Upscale – performs an additional render with 4x-upscaling. This option isn’t visible if the image was upscaled already from the Render Settings. The upscaling is performed by Real-ESRGAN.
- Fix Faces – performs face restoration using GFPGAN. This option is also only shown if the fix incorrect faces and eyes option was not selected when the image was rendered. It’s a shame there’s no control over its strength. Hopefully this is added in the future.
Besides generating images from prompts, Easy Diffusion lets users generate a new image from an input image (img2img) using Stable Diffusion. The Inpainter tool is sweetly implemented letting you instruct the model to only work on a specific area of the image. Another highlight!
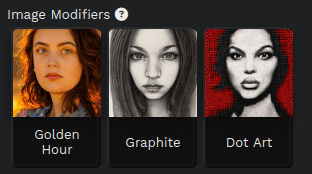 Another great feature are Easy Diffusion’s image modifiers. There are a wide range of modifiers to choose from, we’re just showing three.
You can adjust their weights by using Ctrl+Mouse wheel, the strength of the weights are shown next to the text label e.g. ((Golden Hour)).
Summary
The project has put a lot of effort in making a well-designed web interface. We’d go as far to say it’s the easiest user interface we’ve tried so far for Stable Diffusion. We love how options overlay in generated images, and the ability to queue multiple prompts. More importantly the user is not bamboozled by a million different settings. Some additional functionality would still be welcome such as support for LoRAs (add-ons to models), ControlNet, and CodeFormer.
The installation procedure has been refined so that all the heavy lifting is performed by the software’s script; it really is as easy to install as software in a package manager. That’s certainly not the case for many Machine Learning projects.
Given that the software is targeted at newcomers, we’d love to see a model manager implemented whereby the user could just point and click to download models from Civitai, a great website to download models. Having reached out to the project, we understand that a model manager is in their plans. Anything that makes things easier for end users is always welcome. Nice touches like auto-updates are already present, and there’s a beta version, activated from the Settings if you prefer the cutting-edge.
,
You may prefer keeping your models in a separate location (handy to share the models with other software). Until the project implements such functionality, we’ll use a symbolic link to do this. For example, our models are stored in ~/AI/models/ and Easy Diffusion stores the SD modules in ~/easy-diffusion/models/stable-diffusion/. We download the SD v2-1_768-ema-pruned.safetensors model to ~/AI/models and link with the commands:
$ cd ~/easy-diffusion/models/stable-diffusion/
$ ln -sf ~/AI/models/stable-diffusion/v2-1_768-ema-pruned.safetensors v2-1_768-ema-pruned.safetensors
You’ll need a dedicated NVIDIA graphics card with 4GB of VRAM or more (you can make do with 3GB), else all the rendering will be CPU-bound and very slow! For example, rendering a 512×512 pixel image with the Stable Diffusion 1.4 model takes around 5 seconds with an NVIDIA GeForce RTX 3060 Ti GPU. We also tested rendering using two fairly modern CPUs. With a i5-12400F and i5-10400 rendering took 127 seconds and 151 seconds respectively. The fact that you need a good dedicated graphics card to render quickly has nothing to do with Easy Diffusion itself.
Website: stable-diffusion-ui.github.io
Support: GitHub Code Repository
Developer: cmdr2 and contributors
License: Open Source
Easy Diffusion is written in JavaScript and Python. Learn JavaScript with our recommended free books and free tutorials. Learn Python with our recommended free books and free tutorials.
![]() For other useful open source apps that use machine learning/deep learning, we’ve compiled this roundup.
For other useful open source apps that use machine learning/deep learning, we’ve compiled this roundup.
Pages in this article:
Page 1 – Introduction and Installation
Page 2 – In Operation and Summary
Please read our Comment Policy before commenting.