
Last Updated on April 27, 2023
Set up Chromium to use omxplayerGUI for video streaming
1. Install the Minimal Kiosk Browser (kweb) system.
This installs omxplayerGUI, Minimal Kiosk Browser, youtube-dl, and other necessary components.
At a shell prompt, type the following commands:
$ tar -xzf kweb-1.7.9.8.tar.gz
$ cd kweb-1.7.9.8
$ ./debinstall
$ wget https://steinerdatenbank.de/software/kweb_upgrade_buster_20190823.tar.gz
$ tar -xzf kweb_upgrade_buster_20190823.tar.gz
$ cd kweb_upgrade_buster_20190823
$ ./install
This adds 2 menu entries: Minimal Kiosk Browser (in Internet), and omxplayerGUI (in Sound & Video). The Minimal Kiosk Browser configures omxplayerGUI.
2. Add a PLAY VIDEO bookmark to Chromium
To Chromium’s bookmark bar, right click, and select Add Page.
In the Name field type: PLAY VIDEO
In the URL field type:
var%20myWindow=window.open(final,’_top’)})();
Enter the above code as a single line (I’ve had to the split the line as it doesn’t display properly in Chromium).
3. Create shell script to launch Chromium
Create a text file with the command:
Add these lines to this file and save.
bgstart_ytdl_server.sh -a=omxplayer & chromium-browser
Make the chromium-omxplayerGUI.sh executable with the command:
4. Configure omxplayerGUI to use ALSA (this step may not be necessary depending on your configuration).
Open Minimal Kiosk Browser from the Pi Application Menu. Go to file:///usr/local/share/kweb/kweb_about_s.html
In the section GENERAL OMXPLAYER AUDIO VIDEO OPTIONS, change the omxaudiooptions to:
-o
alsa
and click the Save button.
5. Add an entry to the Pi Application Menu.
Click on the Application Menu > Preferences > Main Menu Editor.
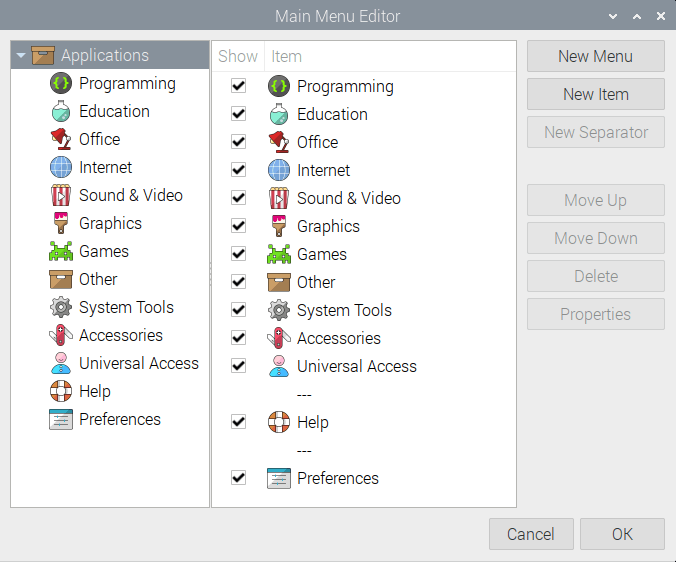
Select Internet in the left hand column, and click New Item. A dialog box will open up titled Launcher Properties.
In the Name field type: Chromium omxplayerGUI
In the Command field type: bash chromium-omxplayerGUI.sh
Click OK to close the Launcher Properties dialog. Click OK on the Main Menu Editor to accept the change. Once done, a new item will appear in the Internet menu.
There’s many other configuration options for you to configure as desired, but the above steps should get you started.
Next page: Page 3 – Set up streamlink
Pages in this article:
Page 1 – Video Streaming
Page 2 – Set up Chromium to use omxplayerGUI for video streaming
Page 3 – Set up and configure streamlink
Read all my blog posts about the RPI4.
| Raspberry Pi 4 Blog | |
|---|---|
| Week 36 | Manage your personal collections on the RPI4 |
| Week 35 | Survey of terminal emulators |
| Week 34 | Search the desktop with the latest version of Recoll |
| Week 33 | Personal Information Managers on the RPI4 |
| Week 32 | Keep a diary with the RPI4 |
| Week 31 | Process complex mathematical functions, plot 2D and 3D graphs with calculators |
| Week 30 | Internet radio on this tiny computer. A detailed survey of open source software |
| Week 29 | Professionally manage your photo collection with digiKam |
| Week 28 | Typeset beautifully with LyX |
| Week 27 | Software that teaches young people how to learn basic computing skills and beyond |
| Week 26 | Firefox revisited - Raspbian now offers a real alternative to Chromium |
| Week 25 | Turn the Raspberry Pi 4 into a low power writing machine |
| Week 24 | Keep the kids learning and having fun |
| Week 23 | Lots of choices to view images |
| Week 22 | Listening to podcasts on the RPI4 |
| Week 21 | File management on the RPI4 |
| Week 20 | Open Broadcaster Software (OBS Studio) on the RPI4 |
| Week 19 | Keep up-to-date with these news aggregators |
| Week 18 | Web Browsers Again: Firefox |
| Week 17 | Retro gaming on the RPI4 |
| Week 16 | Screen capturing with the RPI4 |
| Week 15 | Emulate the Amiga, ZX Spectrum, and the Atari ST on the RPI4 |
| Week 14 | Choose the right model of the RPI4 for your desktop needs |
| Week 13 | Using the RPI4 as a screencaster |
| Week 12 | Have fun reading comics on the RPI4 with YACReader, MComix, and more |
| Week 11 | Turn the RPI4 into a complete home theater |
| Week 10 | Watching locally stored video with VLC, OMXPlayer, and others |
| Week 9 | PDF viewing on the RPI4 |
| Week 8 | Access the RPI4 remotely running GUI apps |
| Week 7 | e-book tools are put under the microscope |
| Week 6 | The office suite is the archetypal business software. LibreOffice is tested |
| Week 5 | Managing your email box with the RPI4 |
| Week 4 | Web surfing on the RPI4 looking at Chromium, Vivaldi, Firefox, and Midori |
| Week 3 | Video streaming with Chromium & omxplayerGUI as well as streamlink |
| Week 2 | A survey of open source music players on the RPI4 including Tauon Music Box |
| Week 1 | An introduction to the world of the RPI4 looking at musikcube and PiPackages |
This blog is written on the RPI4.
in step 3 it is saying .local does not exist. any ideas? also will this work for sports streaming sites with embeded streams such as [link removed]? if not what is the workaround for this?
I ran into the same issue. I am no Linux guru but this seemed to get the job done (or it just did something useless, lol). As you mentioned the .local would come up as non-existent, so I just stepped it down to:
nano /bin/chromium-omxplayerGUI.sh
But then it will tell you that you do not have permissions to write there. Get past this by using the admin privileges with the “sudo” command. So it should now look like this:
sudo nano/bin/chromium-omxplayerGUI.sh
Run through the steps listed above after that then press: Ctrl+X when done editing, agree to it by pressing “y”, and then press “Enter” to exit back to the command line.
To make it executable you have to do the chmod with sudo as well. So it should look like this:
sudo chmod u+x /bin/chromium-omxplayerGUI.sh
The instructions on the blog are amazing, and half the fun of using Linux for me is getting past some of these little road blocks (which are usually due to me missing a step or fat fingering something). I hope this helps for those like me who are just trying to get used to the Linux environment.
P.S. I mainly like to watch Twitch streams and this addition of the omxplayerGUI is freaking AMAZING! Thanks Luke for the “how-to” with this.
So, I’m a little confused as to how to use this — when do I need to use the Play Video button? If I look at a ps listing, or watch “top”, should I see anything besides chromium using a lot of cpu? I’ve started the browser using the new menu entry under Internet, but I’m still seeing video tearing, and rippling during pans.
A little late to the Party. Sorry. I have been using a Pi as home desktop for a while (on the kitchen table). If you have not done a video on using the Pi as a thin client to connect to business networks (or in my case a school) then it’s well worth it.
There are a few other options to consider. I strongly recommend not playing videos in the browser (unless you have / need to). However Smtube works brilliantly with VLC, or if you want subtitles to your youtube or similar I recommend using Youtube-dl and MPV.
I believe there is now a fix for Tearing on Youtube videos. However I apprciate this article was written a little while ago.
[link removed]