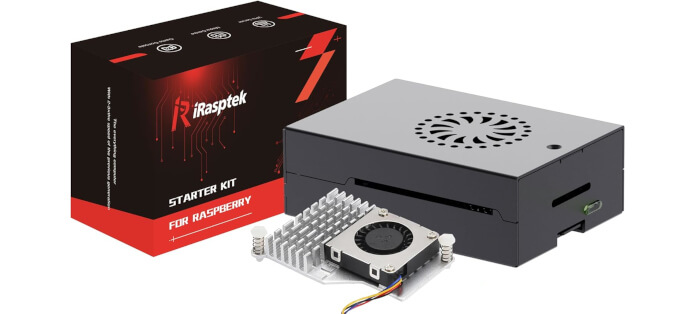
Metal Case
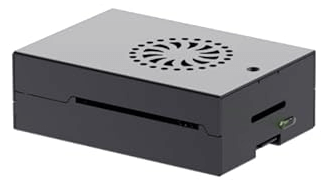 The case supplied with the starter kit is not the official Raspberry Pi 5 case. Unlike the official plastic case, this one is a sturdy aluminum affair.
I like the case. It’s very easy to assemble, looks attractive, offers better ventilation than the official case, and it’s better at dissipating heat. Sure there are more refined cases available for the Pi 5, but for someone new to the Pi scene, it’s a basic yet solid case.
I’ve seen a few exotic cases for the Raspberry Pi which reduce WiFi performance by up to 20-50 MBits/sec. particularly where the Pi is buried inside a larger case. That’s not the case here. The metal case doesn’t reduce WiFi speed. That may not be an important factor for you though e.g. if you run the Pi over ethernet exclusively.
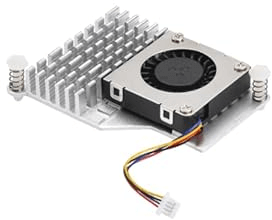
Active Cooler
 For desktop use, I strongly recommend you don’t run the Pi 5 without a fan and heatsink. I love totally silent computers, but with no cooling, a Raspberry Pi’s CPU idle temperature is around 65°C. Under stress it hits the thermal limit which impacts performance.
The kit supplies an active cooler. The cooler is a single-piece anodized aluminium heatsink with an integrated blower. It has pre-applied thermal pads for heat transfer, and is mounted to the Raspberry Pi 5 board directly using spring-loaded push pins. It keeps the computer running at a comfortable operating temperature even under heavy load.
Courtesy of the passive heatsink, the idle temperature is much lower. On a warm May day here in sunny England it drops below 50°C. When the CPU temperature rises above 50°C the fan starts spinning. But unlike many mini PC, fan noise is minimal, it’s inaudible from 1 metre in a quiet room. Even when the temperature rises above 60°C (the 2nd cooling level) fan noise is still very quiet. And unlike many mini PCs, you’ve got complete flexibility to change the four different temperature thresholds, the temperature hysteresis, and the fan PWM setting. All you need to do is add a few lines to the /boot/firmware/config.txt file.
Here’s an example where I’ve change my Pi 5 so the fan comes on at a speed of 55°C (that’s around 1780RPM) and remains on until the temperature reaches the hysteresis point of 53°C at which point it turns off. I’ve also change the temperature threshold settings for the 2nd and 3rd cooling levels, and their respective fan PWM settings.
dtparam=fan_temp0=55000
dtparam=fan_temp0_hyst=2000
dtparam=fan_temp0_speed=50
dtparam=fan_temp1=60000
dtparam=fan_temp1_hyst=5000
dtparam=fan_temp1_speed=75
dtparam=fan_temp2=70000
dtparam=fan_temp2_hyst=5000
dtparam=fan_temp2_speed=125
I’ve not defined the 4th cooling level so that’s at its default (when the temperature hits 75°C the fan speed is 250).
Next page: Page 4 – microSD card
Pages in this article:
Page 1 – Introduction and Installation
Page 2 – Raspberry Pi 5 single board computer
Page 3 – Metal Case and Active Cooler
Page 4 – microSD card
Page 5 – Summary
All articles in this series:
| Raspberry Pi 5 Series | |
|---|---|
Hardware | |
| iRasptek Starter Kit | All the kit you need to get started with the Pi 5 |
| Pironman 5 Case Review | Transform the Pi 5 into a beautiful desktop mini PC |
| Passive Cooling the Pi 5 | Passively cool your Pi 5 the right way. Silent yet cool |
| Benchmarking | Benchmarking the Pi 5 against an Intel N100 mini PC |
| Overclocking | Let's increase the clock speed of the BCM2712 SoC |
| Power Consumption | Compare the power consumption of the Pi 5 with Intel Mini PCs |
| 2.5Gbps Networking | Improving the wired performance of the Pi 5 |
| WiFi | Improve WiFi performance of the Pi 5 |
| Desktop PC | Is the Pi 5 good value compared to an Intel N100 Mini PC? |
Configuration | |
| raspi-config | Useful text-based tool to configure the Pi 5 |
| PiGro | GUI tool that streamlines the process of managing the Pi 5 |
| Increase Swap Memory Size | Increase the swap size from 512MB to 2GB |
| ZRAM swapdrive | Simple script to use a ZRAM swapdrive instead of a swapfile |
Software | |
| Installing Software | Different ways to install software on the Pi 5 |
| df snap pollution | Replace df with dysk |
| Ollama GUI | Running Large Language Models on the Pi 5 |
| Music Players | GUI and TUI music players explored |
| Internet Radio | Exploring the best options for both GUI and TUI software |
| Many software articles are planned. Stay tuned! | |